Dash cameras have become increasingly popular among drivers in recent years. They are a great way to capture accidents, near misses, and other incidents on the road. Installing a dash cam on your Audi Q3 is a simple process that can be done in just a few steps. In this article, we will take you through the process of installing a dash cam on your Audi Q3.
Why Install a Dash Cam?
Before we dive into the process of installing a dash cam on your Audi Q3, let’s take a moment to discuss why you might want to install a dash cam in the first place. Dash cams offer several benefits, including:
- Recording accidents and incidents on the road for insurance purposes
- Capturing footage of hit-and-run accidents or crimes
- Providing evidence in case of a dispute with another driver
- Monitoring driving habits for personal use or business purposes
- Capturing scenic drives or road trips
Now that we’ve covered the benefits of installing a dash cam, let’s move on to the installation process.
How To Install A Dash Cam In an Audi Q3

Step 1: Choose a Dash Cam
The first step in installing a dash cam on your Audi Q3 is choosing the right one. There are many different types of dash cams on the market, ranging from basic models to advanced options with features like GPS tracking and Wi-Fi connectivity. When choosing a dash cam for your Audi Q3, consider the following factors:
- Quality of video and audio recording
- Size and shape of the dash cam (to ensure it fits properly in your vehicle)
- Additional features like GPS, Wi-Fi, and parking mode
- Price
Step 2: Gather Your Materials
Once you’ve chosen a dash cam, you’ll need to gather the necessary materials to install it in your Audi Q3. Here’s what you’ll need:
- Dash cam
- Dash cam mount
- Power cable
- Pry tool (optional)
Step 3: Choose a Mounting Location
The next step is to choose a mounting location for your dash cam. The ideal location is typically on the windshield, behind the rearview mirror. This will provide the best angle for recording the road ahead while minimizing obstruction to your view of the road. Use the mounting bracket that came with your dash cam to secure it to the windshield.
Step 4: Route the Power Cable
Once the dash cam is securely mounted, you’ll need to route the power cable from the dash cam to the power source. In most cases, this will involve running the cable along the windshield and down the side of the dashboard. Use a pry tool (if necessary) to remove any interior panels or trim that may be blocking your path. Once you’ve routed the cable to the power source, plug it in and test the dash cam to ensure it’s working properly.
Step 5: Tidy Up the Installation
Once the dash cam is mounted and the power cable is routed, it’s time to tidy up the installation. Use cable ties or adhesive clips to secure the power cable along the path you’ve chosen, keeping it neat and tidy. Tuck any excess cable behind the dashboard or under the trim to keep it out of sight.
Step 6: Adjust the Settings
With the dash cam installed and powered on, it’s time to adjust the settings to your liking. Depending on the model you’ve chosen, you may be able to adjust settings like video quality, recording length, and automatic recording modes. Take some time to experiment with the settings to find the configuration that works best for your needs.
Step 7: Test the Dash Cam
Once you’ve installed and configured the dash cam, it’s important to test it to ensure it’s working properly.
Step 7: Test the Dash Cam
Once you’ve installed and configured the dash cam, it’s important to test it to ensure it’s working properly. Take a short drive and make sure that the dash cam is recording video and audio as expected. Check that the video quality is good, the audio is clear, and the dash cam is not obstructing your view of the road. If everything looks good, you’re ready to hit the road with your new dash cam!
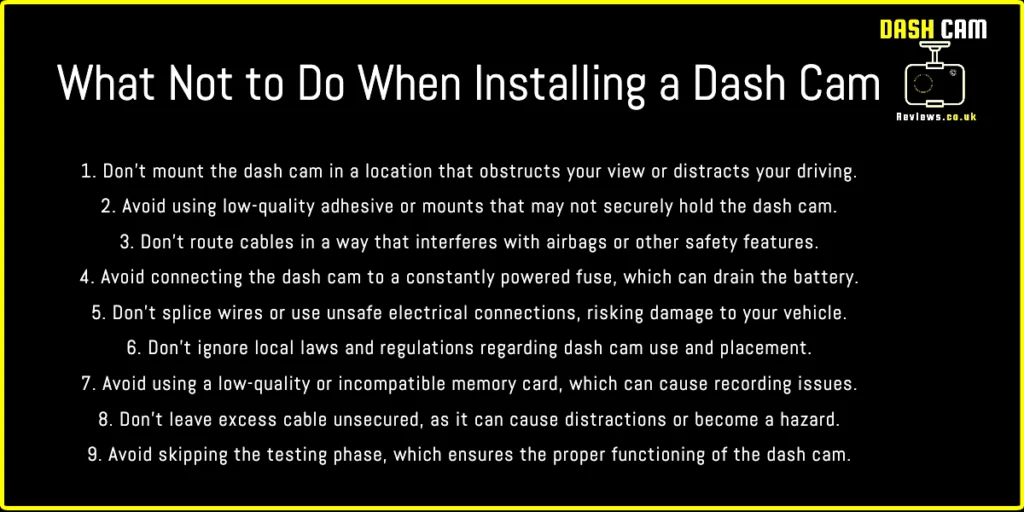
How Not To Install A Dash Cam.
FAQs
Do I need any special tools to install a dash cam on my Audi Q3? No, you don’t need any special tools to install a dash cam on your Audi Q3. However, a pry tool may be helpful for removing interior panels or trim if necessary.
Can I install a dash cam on any type of Audi? Yes, you can install a dash cam on any type of Audi, including the Q3.
How long does it take to install a dash cam on an Audi Q3? The installation process typically takes less than an hour, depending on your experience with car electronics and the complexity of your chosen dash cam.
Do I need to hardwire my dash cam to my car’s electrical system? No, you don’t need to hardwire your dash cam to your car’s electrical system. Most dash cams come with a power cable that plugs into your car’s cigarette lighter or USB port.
Can I transfer footage from my dash cam to my computer or smartphone? Yes, most dash cams come with software that allows you to transfer footage to your computer or smartphone for viewing or sharing. Some models even have Wi-Fi connectivity for easy transfer of footage.
Conclusion
Installing a dash cam on your Audi Q3 is a simple process that can provide many benefits, from capturing accidents and incidents on the road to monitoring your driving habits for personal or business use. By following the steps outlined in this article, you can install a dash cam on your Audi Q3 in just a few easy steps.