
Dash cams have become an essential accessory for modern drivers, providing invaluable visual evidence in the event of an accident or traffic dispute, and even offering enhanced security and surveillance features.
With the popularity of these devices on the rise, it’s no surprise that KIA Ceed owners are eager to join the trend. In this article, we’ll provide you with a comprehensive, step-by-step guide on how to install a dash cam on your KIA Ceed, ensuring that you’re well-equipped to capture crucial moments on the road.
Whether you’re a seasoned DIY enthusiast or a first-time installer, our easy-to-follow instructions and expert tips will help you achieve a seamless and secure installation, so you can enjoy the benefits of a dash cam without any hassle.
Preparing for Dash Cam Installation
Choosing the Right Dash Cam
Select a dash cam that suits your needs and preferences, taking into account the aforementioned features. Popular brands for dash cams include Garmin, Nextbase, and BlackVue, all of which offer a range of models with different specifications.
Gathering Installation Tools
Before starting the installation, gather the necessary tools and materials. You’ll need a dash cam, a suitable mount, a power source (either a hardwiring kit or a cigarette lighter adapter), cable clips or adhesive cable holders, a trim removal tool or flathead screwdriver, and a microfiber cloth for cleaning the windshield.
Installing the Dash Cam

Positioning the Dash Cam
First, find the best position for your dash cam. It should be placed behind the rearview mirror, ensuring it doesn’t obstruct your view of the road. Clean the windshield area with a microfiber cloth to remove any dust or debris.
Mounting the Dash Cam
Attach the mount to your dash cam, then peel off the adhesive backing and press the mount firmly against the windshield. Hold it in place for a few seconds to ensure a secure bond. Alternatively, if you’re using a suction cup mount, moisten the suction cup and press it firmly against the windshield.
Connecting the Power Source
Connect the dash cam to the power source of your choice. If you’re using a cigarette lighter adapter, simply plug it into the socket. For a hardwiring kit, consult your KIA Ceed’s user manual to identify the correct fuse box and fuses. Use a trim removal tool or flathead screwdriver to carefully remove the panels concealing the fuse box. Connect the hardwiring kit to the appropriate fuses, following the kit’s instructions. Be sure to attach the ground wire to a metal part of the car’s frame.
Running the Cables
Next, run the cables from the dash cam to the power source. Use cable clips or adhesive cable holders to secure the wires along the edges of the windshield, then tuck them into the headliner and A-pillar trim. Continue running the cables down the side of the dashboard and towards the fuse box or cigarette lighter socket, making sure to keep them neatly tucked away.
Setting Up the Dash Cam
Once everything is connected, turn on your KIA Ceed and power up the dash cam. Adjust the camera angle so that it captures the road ahead without including too much sky or dashboard. Follow the dash cam’s user manual to set the date, time, and other preferences.
Troubleshooting Common Issues
Power Issues
If your dash cam fails to power on, check the connections to the power source. Ensure the cigarette lighter adapter is fully plugged in or that the hardwiring kit is correctly connected to the fuse box. If necessary, replace any blown fuses.
Video Quality Issues
Blurry or poor-quality video may be the result of a dirty lens or incorrect settings. Clean the lens with a microfiber cloth and ensure the video resolution is set to the highest quality available on your dash cam.
Dash Cam Maintenance
Cleaning the Lens
Regularly clean the dash cam lens with a microfiber cloth to ensure clear and crisp video quality. Avoid using harsh chemicals or abrasive materials that could damage the lens.
Updating Firmware
Occasionally, manufacturers release firmware updates to improve performance or add new features. Check your dash cam’s user manual for instructions on how to update the firmware and always keep it up-to-date.
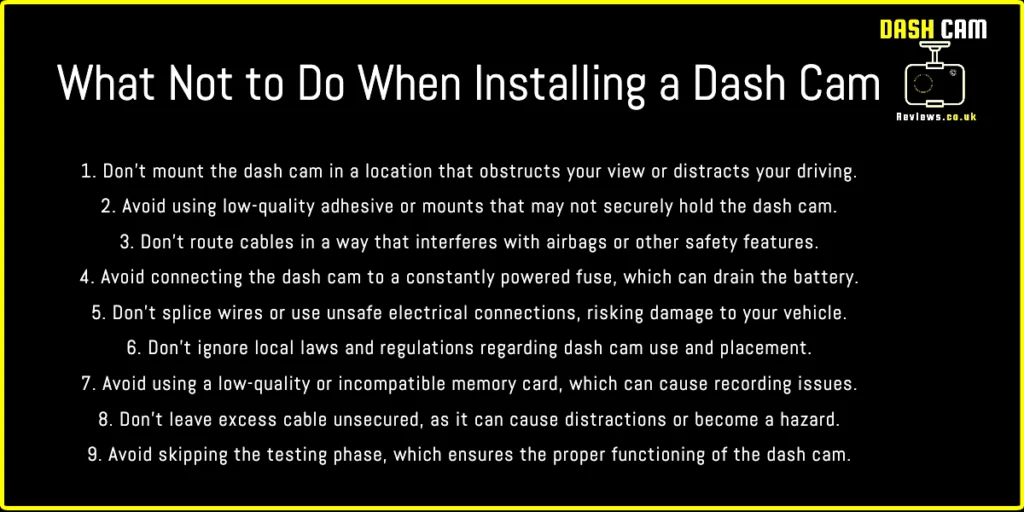
How Not To Install A Dash Cam.
Frequently Asked Questions (FAQs)
Q: Can I use my dash cam in parking mode without draining my car’s battery?
A: Yes, many dash cams come with a parking mode feature that uses a low-power setting to prevent battery drain. Some models also have voltage protection to shut off the camera if the battery voltage drops too low.
Q: How long can a dash cam record before it starts overwriting old footage?
A: The recording time depends on the storage capacity of the memory card and the video quality settings. Most dash cams use loop recording, which automatically overwrites the oldest footage when the card is full. On average, a 32GB memory card can record 4-6 hours of high-quality video.
Q: Can I install a rear dash cam in my KIA Ceed?
A: Yes, you can install a rear dash cam by following a similar process to the front dash cam installation. You’ll need to run the cables from the rear dash cam to the front dash cam or a separate power source.
Q: Are there any legal restrictions on using dash cams in my country?
A: Laws regarding dash cams vary by country and region. It’s essential to research local laws to ensure you’re using your dash cam legally, especially concerning recording public areas, privacy, and data protection.
Q: Can I use my smartphone as a dash cam?
A: While there are apps available that can turn your smartphone into a makeshift dash cam, it’s not recommended due to potential overheating issues, limited battery life, and the inconvenience of setting up and removing your phone each time you drive.
Conclusion
In conclusion, installing a dash cam on a KIA Ceed is a straightforward process that can provide you with added security and peace of mind while driving.
By following the steps outlined in this article, you can ensure a successful installation and enjoy the benefits of having a dash cam in your vehicle. Remember to keep your dash cam clean, up-to-date, and always adhere to local laws and regulations regarding their use.
Stay safe on the road and enjoy the confidence that comes with having a reliable witness by your side.